Cuda Setup Failed Despite Gpu Being Available – Explore For All Details!
I recently faced the “CUDA setup failed despite GPU being available” error while setting up my deep learning project, which turned out to be a mismatch between my NVIDIA driver and CUDA Toolkit versions. After updating both to compatible versions, my GPU was finally recognized and the error resolved.
The “CUDA setup failed despite GPU being available” error means your computer sees the GPU, but CUDA isn’t working correctly. This often happens due to driver and CUDA version mismatches, incorrect settings, or permission issues. Updating drivers and checking environment variables usually fixes it.
“Stuck with the ‘CUDA setup failed’ error even though your GPU is working? Find out how to fix it quickly with our step-by-step guide!”
What Is Cuda?
CUDA (Compute Unified Device Architecture) is a technology created by NVIDIA that allows developers to use NVIDIA GPUs for more than just graphics. It lets you run complex computations on the GPU, which is much faster than using a CPU for certain tasks.
This is particularly useful for applications like scientific simulations, deep learning, and data analysis. By using CUDA, programmers can write code in languages like C, C++, and Python, and leverage the massive parallel processing power of GPUs to speed up their applications significantly.
What Is The Error “Cuda Setup Failed Despite Gpu Being Available”?
The error “CUDA setup failed despite GPU being available” means that even though your computer recognizes and can see the GPU, the CUDA software is not working correctly.
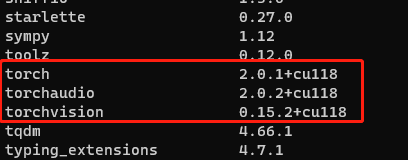
This issue usually arises due to problems like mismatched versions of the CUDA Toolkit and NVIDIA drivers, incorrect system settings or environment variables, insufficient GPU memory, or lack of proper permissions.
It prevents CUDA from being able to use the GPU for processing tasks, causing programs that rely on CUDA to fail.
How To Fix “Cuda Setup Failed Despite Gpu Being Available”
Check NVIDIA Driver Installation:
First, ensure your NVIDIA driver is installed correctly. Open the terminal or command prompt and type:
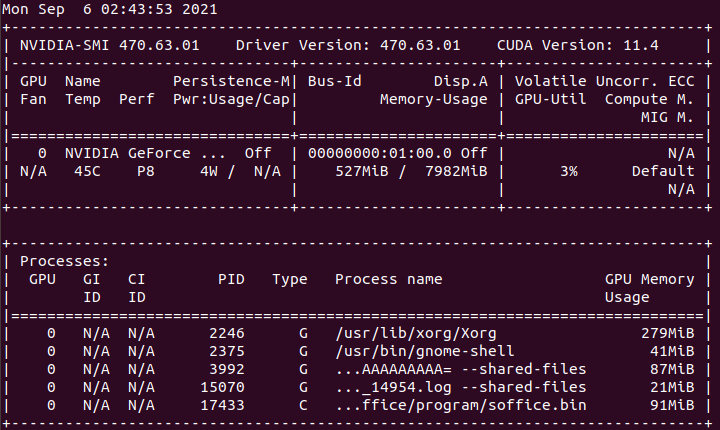
nvidia-smiThis command should display details about your GPU. If it doesn’t, you might need to reinstall your NVIDIA drivers.
Verify CUDA Toolkit Installation:
Check that the CUDA Toolkit is installed and recognized. Run:
nvcc --versionThis will show the version of the CUDA compiler. If the command isn’t found, you may need to add the CUDA bin directory to your PATH environment variable.
Set Environment Variables:
CUDA needs specific environment variables set correctly. Add these lines to your `.bashrc` or `.bash_profile` file (on Windows, adjust as needed):
export PATH=/usr/local/cuda/bin:$PATH
export LD_LIBRARY_PATH=/usr/local/cuda/lib64:$LD_LIBRARY_PATH
After Editing, Reload The File With:
source ~/.bashrcCheck GPU Memory:
Ensure your GPU has enough free memory. Use `nvidia-smi` to check current memory usage and close other GPU-intensive applications if necessary.
Verify GPU Compatibility:
Ensure your GPU is compatible with your CUDA version by checking NVIDIA’s [compatibility matrix](https://developer.nvidia.com/cuda-gpus).
Fix Permission Issues:
On Linux, you might need to adjust permissions. Add your user to the `video` group and set correct permissions on the GPU device files:
sudo usermod -aG video $USER
sudo chmod 666 /dev/nvidia*
Log out and back in to apply the changes.
Manage Multiple CUDA Versions:
If you have multiple CUDA versions installed, ensure your application uses the correct one by setting the appropriate environment variables.
Handle TensorFlow/PyTorch Issues:
If using TensorFlow or PyTorch, install the GPU versions of these libraries:
pip install tensorflow-gpu
pip install torch torchvision torchaudio
Check their documentation for compatibility with your CUDA and cuDNN versions.
Reinstall CUDA And Drivers:
If all else fails, reinstall the CUDA Toolkit and NVIDIA drivers:
sudo apt-get purge nvidia*
sudo apt-get autoremove
sudo apt-get install nvidia-driver-460
wget https://developer.download.nvidia.com/compute/cuda/11.4.2/local_installers/cuda_11.4.2_470.57.02_linux.run
sudo sh cuda_11.4.2_470.57.02_linux.run
Follow the installation instructions carefully to ensure compatibility.
How Do I Check My Cuda Version?
To check your CUDA version, you can use a simple command in your terminal or command prompt. Open your terminal (on Linux or macOS) or command prompt (on Windows) and type the following command:
nvcc --versionThis command will display the version of the CUDA compiler (nvcc) installed on your system. The output will include detailed information about the CUDA version, including the release number and build details.
If this command isn’t recognized, it might mean that the CUDA Toolkit isn’t properly installed or that its bin directory isn’t included in your system’s PATH environment variable.
What Should I Do If I Have Multiple Cuda Versions Installed?
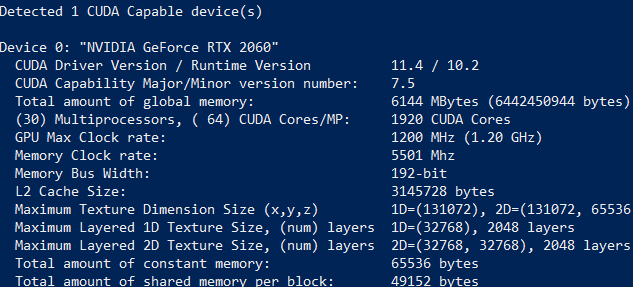
If you have multiple CUDA versions installed, it’s important to ensure your applications use the correct version. Here’s how you can manage multiple CUDA versions:
1. Set Environment Variables:
Adjust your environment variables to point to the desired CUDA version. Add the following lines to your `.bashrc` or `.bash_profile` (on Windows, adjust in System Properties):
1. Open your terminal and edit the `.bashrc` or `.bash_profile` file:
nano ~/.bashrc2. Add the following lines to set the CUDA path (replace `X.Y` with your CUDA version number, like `11.2`):
export PATH=/usr/local/cuda-X.Y/bin:$PATH
export LD_LIBRARY_PATH=/usr/local/cuda-X.Y/lib64:$LD_LIBRARY_PATH3. Save and close the file. Reload the environment variables:
source ~/.bashrc2. Verify the CUDA Version:
After setting the environment variables, verify that the correct CUDA version is being used by running:
nvcc --version3. Manage CUDA with Modules (Advanced):
On some systems, you can use the `module` command to switch between different versions of CUDA easily. For example:
module load cuda/11.24. Ensure Compatibility:
Check your software or framework documentation to ensure it’s compatible with the CUDA version you set. This is especially important for deep learning libraries like TensorFlow or PyTorch, which have specific CUDA and cuDNN version requirements.
How Do I Check If My Gpu Is Recognized?
To check if your GPU is recognized by your system, you can use a simple command in your terminal or command prompt. Open the terminal (on Linux or macOS) or command prompt (on Windows) and type:
nvidia-smiThis command displays information about your GPU, including its model, driver version, and current usage. If you see details about your GPU, it means your system recognizes it. If you get an error or no information, there might be issues with your NVIDIA drivers or GPU installation. You might need to update or reinstall your drivers to fix the problem.
What Should I Do If Nvidia-Smi Doesn’t Work?
If `nvidia-smi` doesn’t work, it means there’s an issue with your NVIDIA drivers or GPU setup. Here’s what you should do:
- Check Driver Installation: Make sure the NVIDIA drivers are installed correctly. You can try reinstalling the drivers by downloading the latest version from the NVIDIA website and following the installation instructions.
- Update Drivers: Outdated drivers can cause issues. Update to the latest drivers from the NVIDIA website. Download the driver for your GPU model and operating system, then run the installer.
- Restart Your Computer: Sometimes, a simple restart can fix issues with `nvidia-smi` by reloading the drivers and hardware.
- Check GPU Hardware: Ensure your GPU is properly connected to the motherboard and power supply. If possible, try reseating the GPU or checking for loose connections.
- Verify System Requirements: Make sure your system meets the requirements for the NVIDIA driver and CUDA Toolkit. Check NVIDIA’s documentation for compatibility.
How Can I Fix Permission Issues With My Gpu?
To fix permission issues with your GPU, follow these steps to ensure your user account has the right access:
1. Add User to the Video Group:
On Linux, your user needs to be in the `video` group to access the GPU. Open the terminal and run:
sudo usermod -aG video $USERAfter running this command, log out and log back in for the changes to take effect.
2. Set Correct Permissions for GPU Files:
Ensure that the GPU device files have the correct permissions. In the terminal, run:
sudo chmod 666 /dev/nvidia*This command allows read and write access to the GPU files for all users.
3. Check Device Files:
Verify that the device files exist. You can list the files with:
ls -l /dev/nvidia*If the files are missing, reinstall the NVIDIA drivers.
FAQs:
1. Why Does This Error Happen?
The “CUDA setup failed despite GPU being available” error happens because CUDA software isn’t set up correctly, even though your computer sees the GPU. This can be due to mismatched drivers, incorrect settings, or permission problems.
2. Why Can’t Cuda Find My Gpu?
CUDA can’t find your GPU if there’s a mismatch between CUDA and NVIDIA drivers, or if environment variables and permissions are set incorrectly. Make sure you have compatible versions and correct settings.
3. What Is The Cuda Toolkit?
The CUDA Toolkit is a set of tools and libraries from NVIDIA that helps developers create programs using the GPU for tasks like calculations and simulations. It includes a compiler, libraries, and documentation for writing CUDA applications.
4. Why Do I Need To Set Environment Variables For Cuda?
You need to set environment variables for CUDA to tell your system where to find CUDA tools and libraries. This helps CUDA applications locate the right files and run correctly.
5. Why Does My Gpu Need Enough Memory For Cuda To Work?
Your GPU needs enough memory for CUDA to work because CUDA processes tasks and stores data directly on the GPU. If the memory is too low, CUDA can’t run its calculations properly.
6. How Do I Free Up Gpu Memory?
To free up GPU memory, close other applications or processes using the GPU, and restart your computer if needed. You can also use `nvidia-smi` to check which processes are using GPU memory and kill them.
7. Can An Unsupported Gpu Cause Cuda Setup Failures?
Yes, an unsupported GPU can cause CUDA setup failures because CUDA needs specific GPU features and compatibility to work. Check NVIDIA’s compatibility matrix to ensure your GPU is supported by your CUDA version.
8. How Do I Update My Nvidia Drivers?
To update your NVIDIA drivers, go to theNVIDIA website, download the latest driver for your GPU, and run the installer. Restart your computer after the installation is complete.
9. Why Might Tensorflow Or Pytorch Cause Cuda Issues?
TensorFlow or PyTorch might cause CUDA issues if you have the wrong version of CUDA or cuDNN installed. Make sure to install the versions that match the requirements listed in their documentation.
10. How Do I Reinstall Cuda Toolkit And Drivers?
To reinstall the CUDA Toolkit and NVIDIA drivers, first uninstall the current versions with sudo apt-get purge nvidia* and sudo apt-get autoremove, then download and run the latest installers from the NVIDIA website.
Conclusion:
In conclusion, if you see “CUDA setup failed despite GPU being available,” it means CUDA isn’t working with your GPU. By checking driver versions, setting environment variables, and fixing permissions, you can resolve this issue and get your CUDA applications running smoothly.

James George is a GPU expert with 5 years of experience in GPU repair. On Techy Cores, he shares practical tips, guides, and troubleshooting advice to help you keep your GPU in top shape. Whether you’re a beginner or a seasoned tech enthusiast, James’s expertise will help you understand and fix your GPU issues easily.


